Wednesday 22 February 2012

10mm Fantasy

A bit of a diversion from my usual Sci-fi offerings now. Some 10mm fantasy, Pendraken Tribal Lizardmen and Kallistra Dark Elves.


I picked these up at Salute a few years at the same time as my gaming buddies also bought 10mm Fantasy armies. We had Undead, Dwarves, Barbarian Tribes (with Bison cavalry) and my Liazardmen with some Dark Elf support, as the Lizardmen were a bit understrength compared to the others.


After many years of pointedly NOT getting around to painting or playing any of the armies (the Ginger One said he'd "tidied them away" which is Ginger Code for thrown them out), I decided to paint up the Lizardmen and Dark Elves so I could at least play against myself in some solo games.

I bought the Pendraken Tribal Lizardmen army bundle, and six packs of the Kallistra Dark Elves (if you bought five, you got one free). The liard dudes were all undercoated with the old GW Ogre Flesh and then given a watered down green ink wash. They were then drybrushed with a series of lighter greens from Orkhide Shade, Gnarlock Green and finally a very light Scorpion Green. Wood, metal and so on were picked out with Calthan Brown and boltgun.

The Dark Elves are mostly still unpainted, apart from the one chariot above. They have quite intricate uniforms that will take a while to do, unlike the "everything green or brown" lizards.

I have also picked up a small army of Dwarves as well, and just done a test paint on a few of them that I'm very happy with. They may get some Orc opponents at Salute if I can broker a deal...

One thing to note is that I changed the way I do my bases after these guys. The bases and the basing material I used here is very light, and the flock is quite coarse and vivid green. I now tend to use a much browner basing material and finer flock as well. I don't think this is all bad, but it does look a bit arid, like a Mediterranean type terrain.


Friday 17 February 2012

Kitbashes Part 3

Continuing in the theme of diecast toys re purposed for 15mm Scifi we now have a very nice 6 wheel APC which appears to be a French 6x6 VAB. The original model was painted in a tan and brown camo pattern, but in gloss colours, with a nasty pearlescent grey plastic missile turret at the back.


I've repainted this with GW foundation Adeptus Battlegrey and then created a fast and dirty (literally) urban camouflage pattern with light grey, white and black. The turret is made from spare machine guns from a Flames of War US M13 MGMC, the wheel from an Androidz toy and the chopped off base piece of an Old Crow cannon that was used in the great failed hairspray and salt WW1 tank experiment. It also got a spare bumper and sand mat (the round thing on the front) from a Flames of War M3 Halftrack glued to the front.


I have 3 more of these and I've just bought some remote turret accessories from Ground Zero Games, so I'll be able to field a mixed force of missile and cannon armed variants. I've also just seen on TMP that Hasslefree miniatures are now doing waterslide decals, including hex nets. For ages I've been wanting to work out a way of replicating the hexagonal pattern urban camouflage seen on the CELL troops and equipment in Crysis 2. Short of cutting out dozens of tiny hexagons myself to do an airbrushed pattern, I couldn't see a way. However, I might have to get some of the Hasslefree transfers and see what I can do with them.


The next one up is a veteran of conversions. I know of at least two or three other websites that have showcased conversions and repaints of this little gem. It's a Matchbox Armoured Response Vehicle.


I got this in a pack with 3 soft plastic figures, a giant cannon of some sort and a very large and boxy HMMWV clone. The HMWWV I'll compare to some other 1/72 HMWWV's that I have and if it's in scale I'll probably repaint for moderns, as it's much too big for 15mm Scifi.


Not much conversion here. I added a spare hatch and .50 HMG from a 15mm WW2 tank (a Command Decision M4A3 Sherman, to be exact) and the winch and bumper from a Flames of War M3 halftrack. The paint is GW Mordian Blue and Shadow Grey with a watered down badab black wash. I'm looking around for some police or security decals to apply to it before I do any more weathering, and there are a few places that need a touch up here and there. I've got another one of these and they're going to be my Security/Police armed response unit.


Thursday 16 February 2012

Kitbashes Part 2

As I mentioned in the last post I've snagged a bunch of el cheapo diecast toys recently from end of run sales at Toys R Us and Poundland (a UK version of a Dollar store, except with, y'know, pounds). Poundland had a run of very useful 6 wheeled APC's and dune buggy's, and a load of Tron Legacy toys all going for just £1 each. £10 got me a host of useful conversion fodder and 50 plastic shot glasses that come in useful for mixing paint, measuring out plaster, cleaning airgun nozzles and even drinking shots if you can't actually find anything constructive to do.

The first conversion is the Dune Buggy.

BRRRRRRM-B-B-B-BRRRRRRM
I've superglued the wheels in place and added some window protection in the form of some textured plasticard and fine mesh cut to size and superglued on. I've also added a spare grenade launcher to the roof from the very stylish and marvellously styled Khurasan Alien Light Scout Vehicle sculpted by the ubiquitous and talented Mr. John Bear Ross


The paint scheme is basic wasteland dirt over rust and primer pattern and was applied quickly and without a great deal of thought, but actually works quite well. I have some Rebel Minis Sahadeen on order and these vehicles are going to be the fast support for my Ash Wastes raider force.


A quick note on the backgrounds, I usually use a light box that I picked up for a song at Maplins (Radio Shack in the US) but my recent experiment with MiG pigments resulted in the dropcloth getting completely covered in rust pigment. Until I get around to cleaning it, my new light box is a couple of sheets of blue insulation foam I had earmarked for some terrain, hence the lines all over them.

The next kitbash is another quick and simple one to provide the Ash Waste Raiders with some heavy support. Flame Tanks!


I picked up a box of Armourfast PzIII G for a 20mm WW2 skirmish game that never got off the ground years ago. They've been sitting in the box for 2 or 3 years now and I was having a clear out when I rediscovered them. Fairly simple conversion here, I built the body from the box and added a small remote turret from a GW Tau shield generator and Heavy Flamer. A couple of sets of Tau Photon Grenade racks were added to each side as well. I had intended to run some sort of tubing or cables from these to the turret, but in the end left them as is.


The paint scheme is, again, wasteland dirt but I tried to at least give some impression of a camouflage scheme here. It's GW Foundation paints, Charadon Granite, Adeptus Battlegrey and Calthan Brown with Orkhide Shade for the sighting unit on top, I think. A fairly quick and simple conversion.

Monday 13 February 2012

Found 15mm Terrain

This weekend has been remarkably productive for me. In the last couple of weeks I've managed to snag a whole bunch of cheap die-cast toys to be converted into 15mm Scifi goodies. Amongst these were two unexpected pieces of terrain that were both by-products of something else.

The first of these are these habitat domes made from heavy duty casting plaster:


The habitats are plaster casts of the inside of the piece of packaging in the centre, the blister pack for one of the diecast toys i snagged, a robot from the Androidz line (more on which in another post). WHilst unboxing the little fellas I noticed the blister had a nice dome with annex look to it. I was originally going to simply base up the blister packs and paint them, but was worried about them getting crushed, paint not adhering to them and so on. So, instead I used the blister pack as a mould. I picked up some extra strong plaster from Hobbycraft and read the slightly baffling instructions ("fill the mould to the brim with water and pour into a measuring cup, discard half the water and add 2.5 times the missing volume of plaster" - I figured it out in the end). After a slightly shaky start I managed to get four perfect reproductions out of my four blisters. Two of the blister packs tore whilst trying to remove the castings, but considering they've been manufactured in china, heat sealed to a piece of cardboard, been shipped half way round the globe, pawed at by kids and then torn off the cardboard and filled with plaster, I think they've done a bang up job.

I'm going to tech them up them with various accessory pieces from The Scene and Ground Zero Games after they've fully dried and I've sealed them, as I know plaster will just suck the moisture right out of paint.

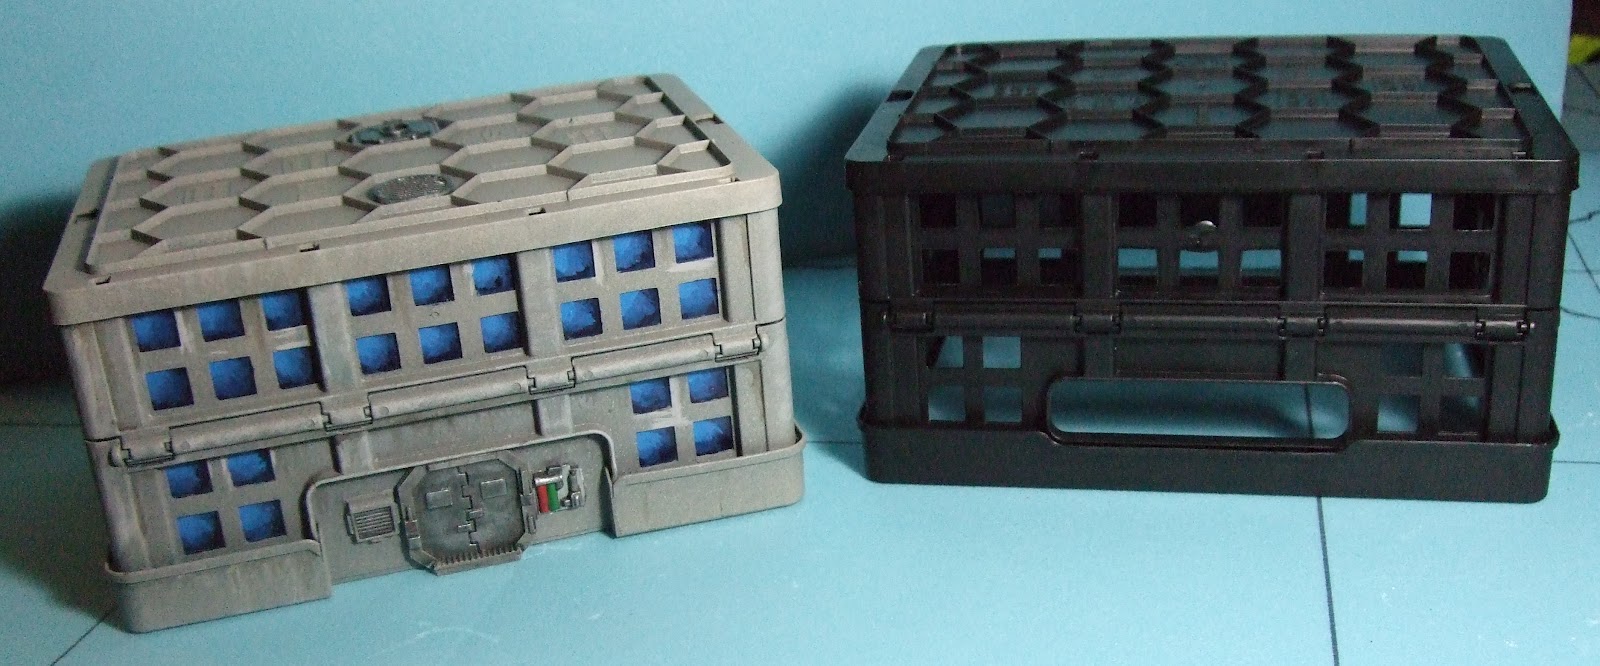
The second of my chance finds was this building from a Really Useful Box collapsible crate, seen here in both before and after the scifi makeover:


These crates were on a shelf in Hobbycraft with all the other Really Useful Box stuff as I was picking up a couple of 9 litre boxes to store various bits of terrain making stuff in. I'm going through a process of throwing out all the old, tatty cardboard boxes that I have full of rattlecans, parts of Airfix of model kit, Polyfilla, glue, flock and bits of balsa wood (or crap, as AGG occasionally calls it) and replacing them with nice new Really Useful Boxes, as they are really usefull. They stack nicely, they fit just right on my shelves and they don't look horrible and tatty. Of course, they are still full of rattlecans, parts of Airfix of model kit, Polyfilla, glue, flock and bits of balsa wood, but at least they stack well....

Anyway, I'd seen a couple of examples of other types of crates being used for 28mm gaming, as post apocalyptic ruins, Gothic buildings and so on, but never seen any that I thought could be used for 15mm without looking like they were just crates turned upside down. I bought a couple to try out the theory (at 99p each, at the worst I'd end up with a cheap storage crate) and some plasticard sheeting to blank off the "windows".

Initially I was going to just blank over the inside, then add another blanking piece to the outside to add a door to, but as I looked at the crate, I realised that the handle could make a nice arched porch to put the door into. I cut back the plastic and stuck a plasticard blanking plate over the interior, plus a couple of smaller pieces a side pillars to tidy up the edges and hold the cut pieces together. I stuck on a few GZG building add-ons and a pair of The Scene air conditioners at each end and began the painting.

I first gave the whole thing a coat of GW Chaos Black. As undercoats go, GW Chaos Black is my standard at the moment. It covers pretty much anything. This was followed up with Plasticoat Grey Primer and a dusting of Plasticoat Beige. I then painted the windows with GW Necron Abyss (or Prussian Blue to everybody without paint name aphasia)  add blended in a highlight towards one corner with a lighter blue - an old put of lightning bolt blue, I think - the label has come off. The doors and tech nits were picked out with Boltgun and various other shades and a few light washed of Badab Black and Devlan Mud gave the building a more weathered appearance.

And they stack - the sky is the limit! 
I'm very, very pleased with the outcome on both of these. Both of them were conceived totally by chance when looking at or for something else. The blister pack habitats were especially rewarding, as I hadn't done any plaster casting for years, since I tried to make Helms Deep out of Linka (I calculated it'd take me about 200 castings to get the pieces I wanted - my teenage brain did not have the commitment for that). I bought some dark blue mounting board which I'm going to use instead of Plasticard to blank off the windows on some more crates, as painting all the individual windows without getting it over the frames is a real chore. I'll let you know how it goes.