Monday 31 March 2014

Dark Ages Wattle Fences

I'm building up a collection of 28mm terrain for some Dark Ages/Age of Arthur gaming, using either Dux Brittanium or Dux Bellorum. As part of this I decided to make up some wattle style fences. Rendera make a nice set in plastic, which I became aware of after I had made my own... 

The construction was fairly simple. I started with a 2 meter length of semi-round wood trim, about 18mm wide and 5 mm high at the peak. I had originally bought this as a base for 15mm bocage, but never got round to using it and it had been snapped this into short lengths to get it into a storage box. I started by sawing off the snapped off ends and sanding down the corners.


I then drilled 2 mm holes along the length of the strips, at semi regular intervals. I varied the distance between them, as I'm thinking the dark ages farmers didn't measure the distances between uprights with any great accuracy.


I then put a blob of super-glue over each hole and inserted a cocktail stick, rotating it as I inserted it to spread the glue around.


Which gave me a veritable forest of spikes. 


These were left to dry thoroughly. You may need to trim the underside if the point of the cocktail stick has protruded all the way through. They can easily be sanded off or cut with a sharp craft knife or scalpel. I then marked off  a line where the top of the fence will be, using a 28mm figure as reference and remembering to take into account the added base thickness that there will be on painted troops. I picked about chest high, just the right height for two dark ages farmers to lean on to discuss the details of turnip farming and pig husbandry. 


I then Sellotaped the tops of the cocktail sticks together. This avoids them pinging across the room like tiny missiles when you clip them off using side cutters. I also tried Dremeling them off using a cutting disk, but it's just as quick to use side cutters. Cutting them this way is quick, but leave the tops slightly flattened. A quick squeeze in the other direction evens them out and give a quite nice roughly cut timber effect.  


I then painted the uprights in Burnt Umber (dark brown) and the base in Burnt Sienna (reddish-brown - GW Bestial Brown is very similar). I left the tops of the uprights unpainted to look like the fresh cut wood inside the bark. The base got a liberal coating of PVA followed by Woodland Scenics Medium Brown Ballast and then Woodland Scenics Medium green flock in patches. The whole thing was then left overnight to dry.


The next day I started to add the wattle to the fences. Wattle is typically made of branches woven between the uprights, either split or whole. I had already experimented with various materials for the wattle itself, including green garden wire, beading wire (which does make great barbed wire, though) and garden twine soaked in PVA, none of which really gave me the effect I wanted.. I had seen a recommendation for thin leather cord on another site and whilst browsing for it at Hobbycraft saw some waxed cotton thread in dark brown. At £3 for 22 meters, I thought this was a bargain, and seemed to be exactly what I was looking for.


I tied the end to one of the uprights and then wove the cord between them, passing on alternate sides as I went. Occasionally I had to stop and push the cord down, as it had a tendency to creep up the uprights. Once I got close to the top I tied off the cord again, and secured it with a dab of super-glue to stop it unravelling. The picture below was on my test piece, which I hadn't painted or flocked at this stage, but the method is the same.


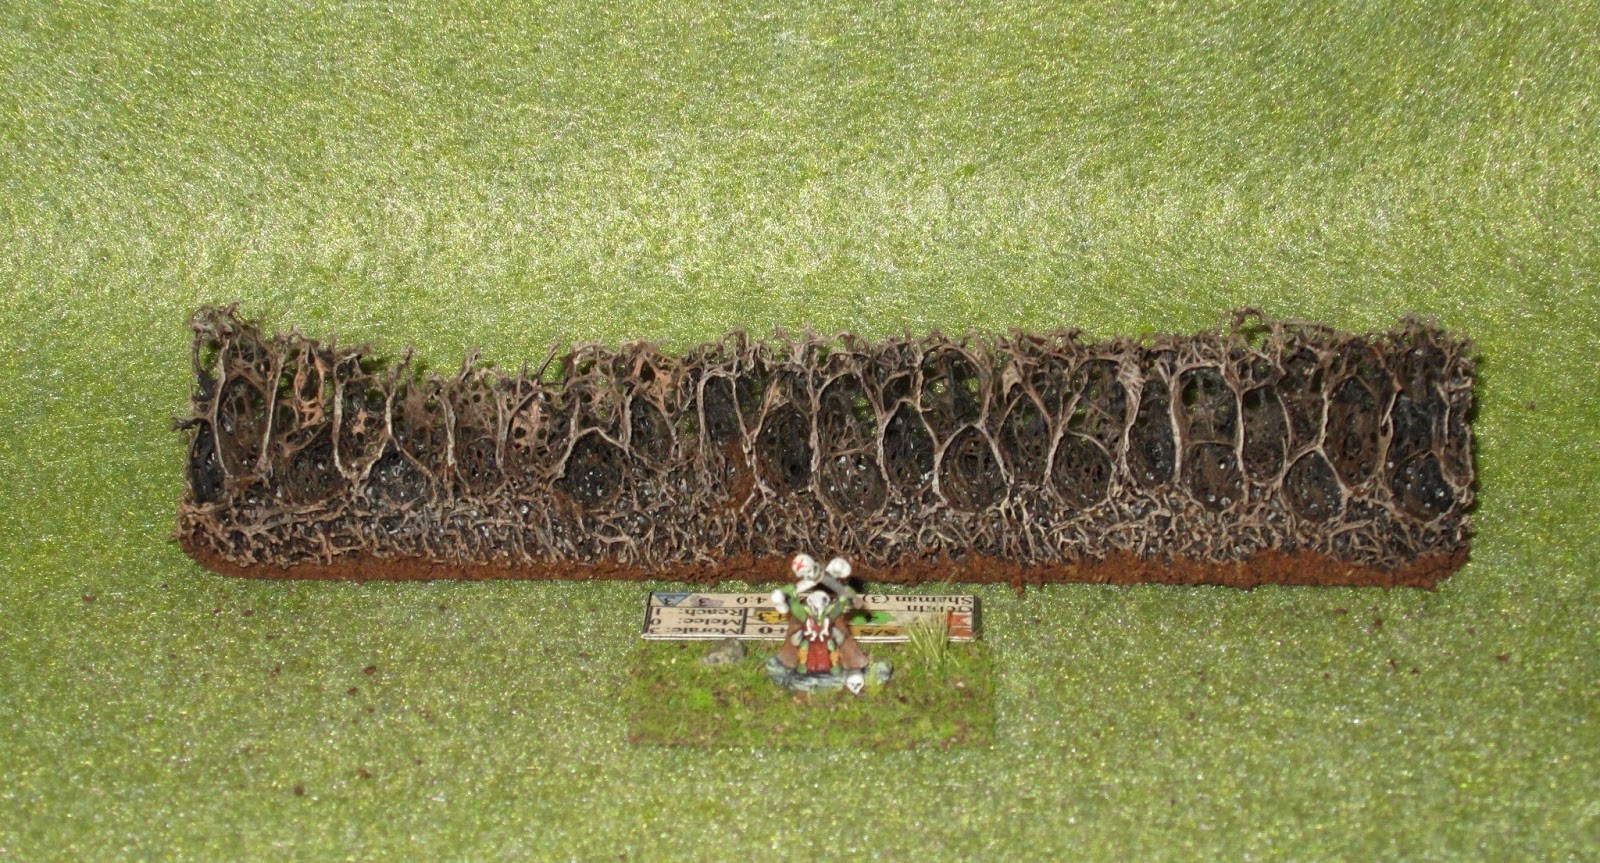
The end result was quite pleasing. I managed to get about 5 or 6 feet of fence from each spool of waxed cotton. They need a misting of watered down PVA from my garden sprayer to fix the flock and ballast in place, and I may experiment with a light drybrush on the cord to bring out the detail, but even as they are I think they look pretty good. I may now go back and re-do a livestock enclosure that I had previously done in garden twine soaked in PVA, replacing that with the waxed cotton.  


 Overall I'm pretty pleased with them. Including painting I managed to get all of the fences completed in two evenings work. The most arduous part is winding the thread around the uprights, which can get quite dull, but the end results are well worth it. I even managed to use my Dremel as a drill without drilling any more holes in the dining room table.

Thursday 27 March 2014

Evil Thorny Hedges and the Indestructible Loofah.

I saw some inspirational pictures of 10mm Evil Thorny Hedges over at One More Gaming Project a while ago and have had an idea in the back of my mind to create some for our Might Armies campaign. I've also been constructing some 28mm dark ages terrain for Dux Britannium, and figured that thorny hedges would be good for that as well.

Picture from One More Gaming Project

I picked up a loofah at Boots for the princely sum of £3.25 whilst on a trip to Hobbycraft and set about cutting it up on my return. Now, Chris mentions in his blog above that the loofah is a seed pod and so as natural plant material is easy to cut. Not my seed pod. I can only assume that Boots have taken to dipping their loofahs in liquid Teflon or possibly Adamantium prior to setting them out on the shop floor. The loofah blunted two new blades in my craft knife before I'd even cut one length. I then switched to scissors and the loofah snapped the scissors! Granted, they were a pair of crappy Ikea multi-pack scissors, but nevertheless, the loofah was proving to be remarkably resilient.

I switched over to a serious tool now -  a retired bread knife. Withdrawn from front-line bread cutting duties, this knife is held in secure storage in the man cave and held in reserve for serious cutting duties. Usually polystyrene loft insulation. When presented with the loofah I found that it did not cut the seed pod, but did jump and do an excellent job of cutting into my thumb. I super glued the wound closed (works a treat)  and considered my next move...


With this level of defiance, there was only one option left: Overwhelming retaliation. I broke out the Dremel. All was going well, I stripped off one length or thorny hedge, and was working on separating out the next  when, in a shower of cutting disk shards, the loofah of doom broke the cutting disk....


I'm beginning to think that perhaps this loofah is truly evil. I've cut the single strip I have managed to remove into sections and started to base it up. It's now awaiting some undercoat before I drybrush up and add on the basing material.


As you can see below, the loofah gives a really great thorny texture. I think, combined with some clump foliage, it could also make a good basis for bocage. The "base" of the hedge could easily be clad in air drying clay or filler to make the raised banks, and either hot glueing or super gluing clump foliage to the top would leave a thicket of branches in the middle.


Monday 3 March 2014

Titanium Dropship Painting Competition - 2nd Place!

I recently entered the Titanium Dropship painting competition run by the guys over at the excellent Dropship Horizon (a regular lurking zone of mine). The competition had three categories, one for a squad of miniatures, one for a vehicle and one for a piece or small collection of terrain pieces.

I placed an entry in each of the three categories, a set of scratch built colony domes, a GZG Crusty heavy weapons squad made up of the mortars and arc cannons, and a GZG Crusty light walker. Each entry was allowed three pictures, and the pictures I entered are all below.


I'm really pleased to say that the colony domes came second in their category, behind a really excellent diorama of the walker suit from District 9 in the shanty town (the same walker I entered in the vehicle category, in fact). You can see the first place, second place and third place entries at the Dropship Horizon blog, and all the other entries can be seen here.

I was particularly impressed by the conversions done to make some proxies for 15mm GW Terminators and really liked the colour schemes for the NVL troops in this entry. The ACAV combat car really impressed me with the simple but effective colour scheme and a few additions that made it look really lived in, likewise the tank from Paul at Mini Metal Mayhem. He also entered a really great set of Red Shadows that I am not totally jealous of at all.

The colony domes were plaster casts from the blister packaging  of some old Androidz toys that I picked up at the bargain bin at Toys R Us. I made four castings out of the blister packs that I had salvaged, but removing the castings wrecked the blisters, so I'm unlikely to be able to use them again. I've been making quite a few plaster casts recently, and I'm considering in investing in a few of the Hirst Arts plaster moulds to add some scifi greeblies.


I really enjoyed choosing which minis to enter for each category, and it's really prompted me to up my game for next year. Seeing the other entrants was really interesting and has given me lots of inspiration for new techniques and paint schemes to try out.

One suggestion I would make would possibly to have separate categories for professional painters and amateurs. I've no idea if this is common or not - I've never entered a painting competition before so it may be that it's common for the armature and professional painters to be competing alongside each other.