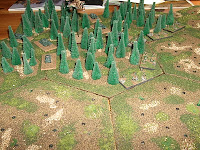
A quick guide to some forest terrain I made for 6mm gaming. I have micro scale models for WW2 USA and Finns, Cold war Russians and 3 or 4 different few Sci-fi armies too. Most of the forest terrain I had was designed for 15mm or larger, so tended to dwarf all the units.
I was browsing in Hobbycraft one day and came across some wavy pipecleaner packs they had in various colours. Thinking I could do something with them, I picked up a pack.
I had already commissioned some large hex shaped pieces of MDF from Warbases.co.uk. These were originally just going to be painted green to use as a way of distinguishing area cover, by placing normal, based trees on top of – allowing me to retire the threadbare and fraying pieces of cloth I’d previously used. The hexes can be joined together to create larger areas and other types of scatter placed on them to show scrub, fields, swamp or whatever.
I started by clipping the pipe cleaners into smaller pieces, cutting through the centre of the fattest part, and then through the thinnest part. I varied the distance I made the cuts, and found after a while that it was better to leave a short section between the thinnest parts to avoid the tree looking too spindly.
Once cut the tiny trees were pushed into some handy corrugated cardboard and given a spray of GW Black undercoat to hide the very artificial green. I then used whatever green sprays I had to hand and did some very haphazard sprays over them, trying to go from dark to light in fairly even, light coats. I didn’t want the paint to clump the Chenille fibres too much. Once they were all dry I gave them a couple of coats of GW Hardcoat and a blast of Humbrol Matt varnish.
Meanwhile I started to prepare the hex bases to take the trees. I took a stack of 5 or 6 bases and used a Dremel with a 2mm bit to drill about 20 random holes in the bases. I did this by stacking them up and just drilling down through them. I did this on a cutting mat to preserve the table.
Unfortunately it hadn’t occurred to me that a Dremel will drill straight through 6 2mm MDF pieces, a 4mm cutting mat, 4 coats of hand polished varnish, 6 layers of hand buffed beeswax polish and 4 or 5mm of pine without breaking a sweat. I managed to drill 20 or so random holes in my dining room table.... Oh well. I’ll do a post on how to fill 10 or so tiny holes in a dining room table some other time.
I then sprayed some of the Hexes with a can of plasticoat brown I had to hand. I then coated them in a mix of 50/50 PVA and water and liberally coated them with Woodland Scenic’s Medium brown ballast. Once this was dry I sprayed them with Woodland Scenic’s scenery cement from a spray gun thingy. I let this almost dry before I randomly sprinkled some fine green flock and mixed scatter I had - source lost to the mists of time. Once this was done I re-sprayed them with the scenic cement and left them to dry in a nice, sunny spot. They then got 2 coats of Hardcoat and some more of the Humbrol matt Varnish.
At this point I realised I’d managed to block up all of the holes I’d drilled earlier with ballast and flock. I spent ½ hour or so with a scalpel picking out the holes again and then used a Sharpie to mark where the holes were.
Once the holes were cleared, I took the trees from the cardboard and slotted them into the holes....
I’m very pleased with the results. I plan to make another set in a winter theme to go with my Finns. I have a tub of the woodland scenic’s snow for the ground, but will probably just spray the trees with some white paint from above. I’m also going to make a few smaller trees on individual bases to act filler between the hexes.
Here are some shots of them in action with my 6mm Cold War Russians:


4 comments:
Very effective, well done. The hex terrain looks great.
Steve.
I like to use the chenille bumps for 6mm trees as well. I do find they look nicer if you trim the fibres to a point at the top of the tree (takes just a few snips with some scissors). Also, while spraying the paint on thick does make the chenille clump together, you can use this to your advantage; dark green clumpy trees make good spruce, while lighter green ones with no clumps look more piney.
Sorry for necromancing an old post but I have to say... those hex pieces with trees on them make me suddenly desire a 3-D "Settlers of Catan" set.
The thought had crossed my mind, with 10mm or 6mm buildings for vilages and towns.
Post a Comment