Friday, 4 April 2014

Dark Ages Church WIP

A few quick WIP shots of my Dark Ages church, inspired by some excellent churches here, here and here.

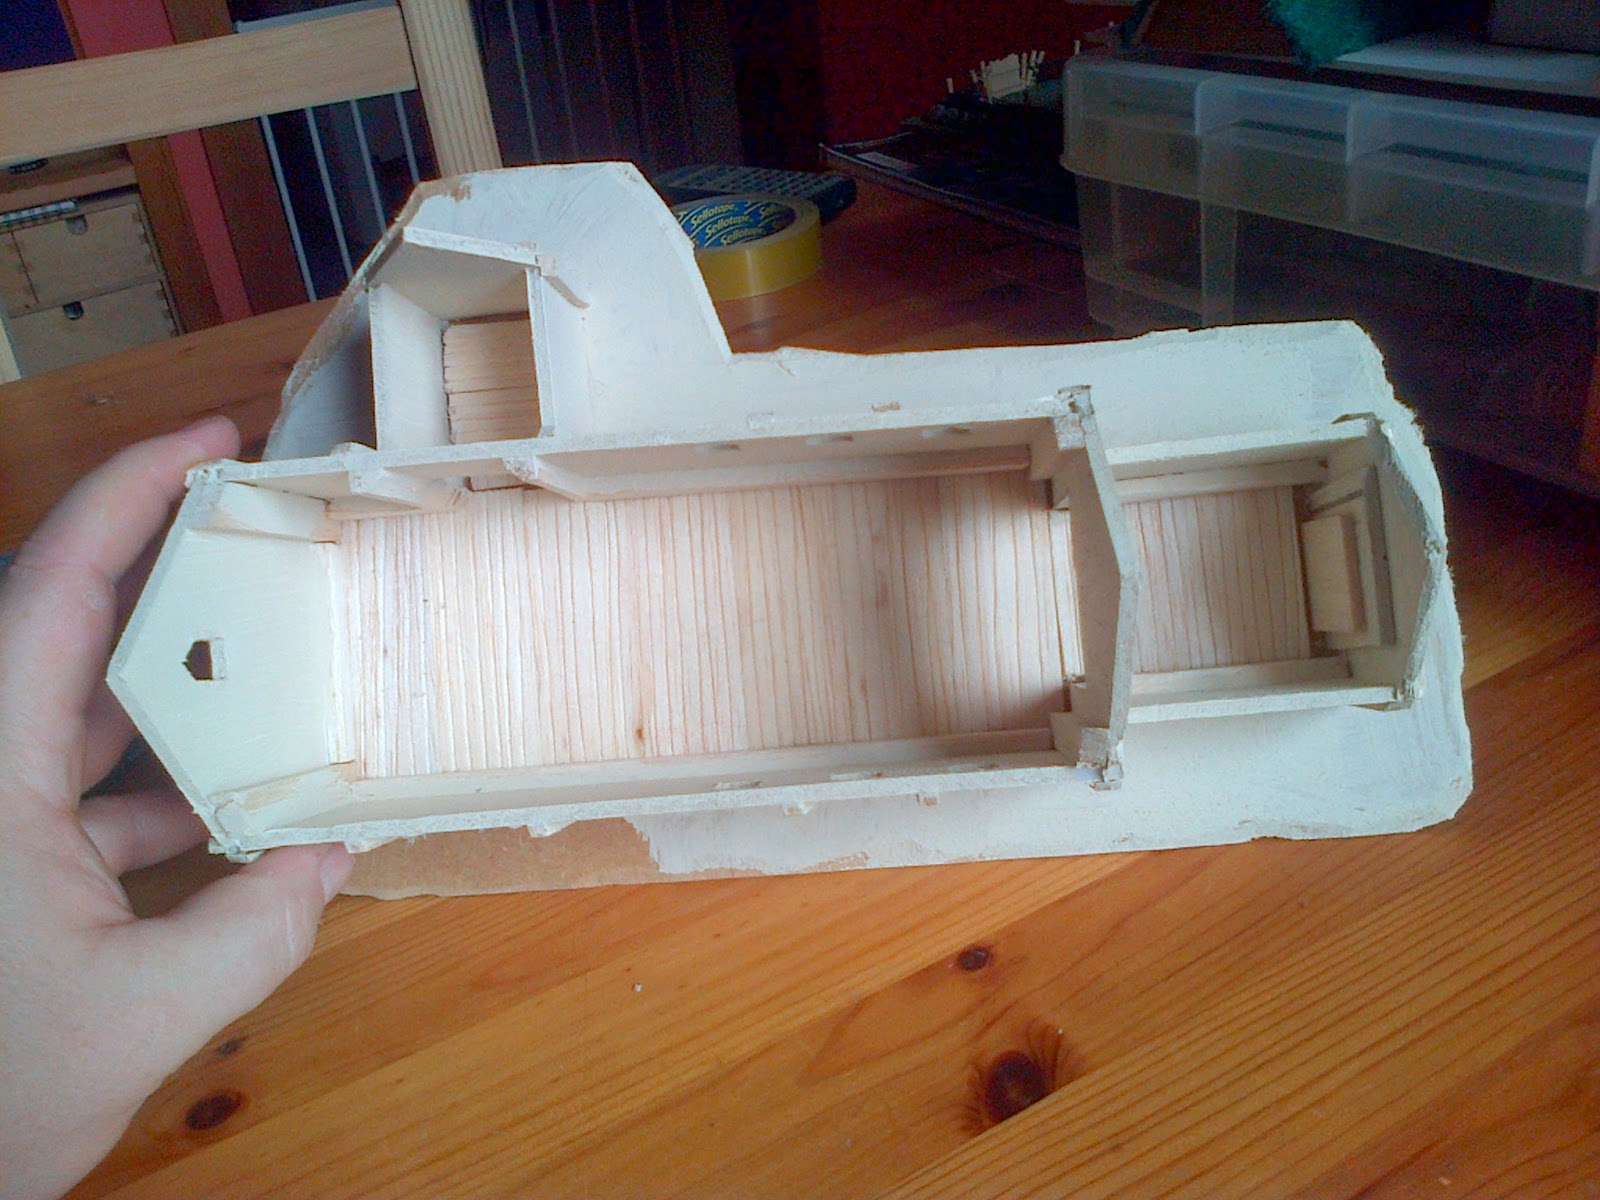
The main body of the church is made from 3mm foamcore card on a hardboard base, dressed with a mix of coffee stirrers, balsa strip and some balsa sheets for the doors and floor. The floor has been laid as planks, but I suspect it may have been bare stone flags or even dirt in early churches. I've made a bit of a pigs ear of the inside of the doors, as I was going to leave the roof attached,  so they may get boxed in to some kind of archway to hide them.


The thatch roof is green pan scourers split down the middle to make two thin sheets. These are affixed to a roof former of foamcore with PVA and then once dry are painted with 50/50 dilute PVA and water to stop them shedding and add stiffness. You have to be careful with the dilute PVA as it can make the paper backing on the foamcore soggy if you are too liberal.


The building has been under-coated in cream exterior textured paint to seal and add texture to the foamcore. The next stage is to basecoat and then start the highlighting process, which I will start with the airbrush to get most of the colour on, then switch to stippling for the daub texture on the walls. The roof will be airbrushed black and then dry brushed up to a pale grey-brown to represent old thatch.


Monday, 31 March 2014

Dark Ages Wattle Fences

I'm building up a collection of 28mm terrain for some Dark Ages/Age of Arthur gaming, using either Dux Brittanium or Dux Bellorum. As part of this I decided to make up some wattle style fences. Rendera make a nice set in plastic, which I became aware of after I had made my own... 

The construction was fairly simple. I started with a 2 meter length of semi-round wood trim, about 18mm wide and 5 mm high at the peak. I had originally bought this as a base for 15mm bocage, but never got round to using it and it had been snapped this into short lengths to get it into a storage box. I started by sawing off the snapped off ends and sanding down the corners.


I then drilled 2 mm holes along the length of the strips, at semi regular intervals. I varied the distance between them, as I'm thinking the dark ages farmers didn't measure the distances between uprights with any great accuracy.


I then put a blob of super-glue over each hole and inserted a cocktail stick, rotating it as I inserted it to spread the glue around.


Which gave me a veritable forest of spikes. 


These were left to dry thoroughly. You may need to trim the underside if the point of the cocktail stick has protruded all the way through. They can easily be sanded off or cut with a sharp craft knife or scalpel. I then marked off  a line where the top of the fence will be, using a 28mm figure as reference and remembering to take into account the added base thickness that there will be on painted troops. I picked about chest high, just the right height for two dark ages farmers to lean on to discuss the details of turnip farming and pig husbandry. 


I then Sellotaped the tops of the cocktail sticks together. This avoids them pinging across the room like tiny missiles when you clip them off using side cutters. I also tried Dremeling them off using a cutting disk, but it's just as quick to use side cutters. Cutting them this way is quick, but leave the tops slightly flattened. A quick squeeze in the other direction evens them out and give a quite nice roughly cut timber effect.  


I then painted the uprights in Burnt Umber (dark brown) and the base in Burnt Sienna (reddish-brown - GW Bestial Brown is very similar). I left the tops of the uprights unpainted to look like the fresh cut wood inside the bark. The base got a liberal coating of PVA followed by Woodland Scenics Medium Brown Ballast and then Woodland Scenics Medium green flock in patches. The whole thing was then left overnight to dry.


The next day I started to add the wattle to the fences. Wattle is typically made of branches woven between the uprights, either split or whole. I had already experimented with various materials for the wattle itself, including green garden wire, beading wire (which does make great barbed wire, though) and garden twine soaked in PVA, none of which really gave me the effect I wanted.. I had seen a recommendation for thin leather cord on another site and whilst browsing for it at Hobbycraft saw some waxed cotton thread in dark brown. At £3 for 22 meters, I thought this was a bargain, and seemed to be exactly what I was looking for.


I tied the end to one of the uprights and then wove the cord between them, passing on alternate sides as I went. Occasionally I had to stop and push the cord down, as it had a tendency to creep up the uprights. Once I got close to the top I tied off the cord again, and secured it with a dab of super-glue to stop it unravelling. The picture below was on my test piece, which I hadn't painted or flocked at this stage, but the method is the same.


The end result was quite pleasing. I managed to get about 5 or 6 feet of fence from each spool of waxed cotton. They need a misting of watered down PVA from my garden sprayer to fix the flock and ballast in place, and I may experiment with a light drybrush on the cord to bring out the detail, but even as they are I think they look pretty good. I may now go back and re-do a livestock enclosure that I had previously done in garden twine soaked in PVA, replacing that with the waxed cotton.  


 Overall I'm pretty pleased with them. Including painting I managed to get all of the fences completed in two evenings work. The most arduous part is winding the thread around the uprights, which can get quite dull, but the end results are well worth it. I even managed to use my Dremel as a drill without drilling any more holes in the dining room table.

Thursday, 27 March 2014

Evil Thorny Hedges and the Indestructible Loofah.

I saw some inspirational pictures of 10mm Evil Thorny Hedges over at One More Gaming Project a while ago and have had an idea in the back of my mind to create some for our Might Armies campaign. I've also been constructing some 28mm dark ages terrain for Dux Britannium, and figured that thorny hedges would be good for that as well.

Picture from One More Gaming Project

I picked up a loofah at Boots for the princely sum of £3.25 whilst on a trip to Hobbycraft and set about cutting it up on my return. Now, Chris mentions in his blog above that the loofah is a seed pod and so as natural plant material is easy to cut. Not my seed pod. I can only assume that Boots have taken to dipping their loofahs in liquid Teflon or possibly Adamantium prior to setting them out on the shop floor. The loofah blunted two new blades in my craft knife before I'd even cut one length. I then switched to scissors and the loofah snapped the scissors! Granted, they were a pair of crappy Ikea multi-pack scissors, but nevertheless, the loofah was proving to be remarkably resilient.

I switched over to a serious tool now -  a retired bread knife. Withdrawn from front-line bread cutting duties, this knife is held in secure storage in the man cave and held in reserve for serious cutting duties. Usually polystyrene loft insulation. When presented with the loofah I found that it did not cut the seed pod, but did jump and do an excellent job of cutting into my thumb. I super glued the wound closed (works a treat)  and considered my next move...


With this level of defiance, there was only one option left: Overwhelming retaliation. I broke out the Dremel. All was going well, I stripped off one length or thorny hedge, and was working on separating out the next  when, in a shower of cutting disk shards, the loofah of doom broke the cutting disk....


I'm beginning to think that perhaps this loofah is truly evil. I've cut the single strip I have managed to remove into sections and started to base it up. It's now awaiting some undercoat before I drybrush up and add on the basing material.


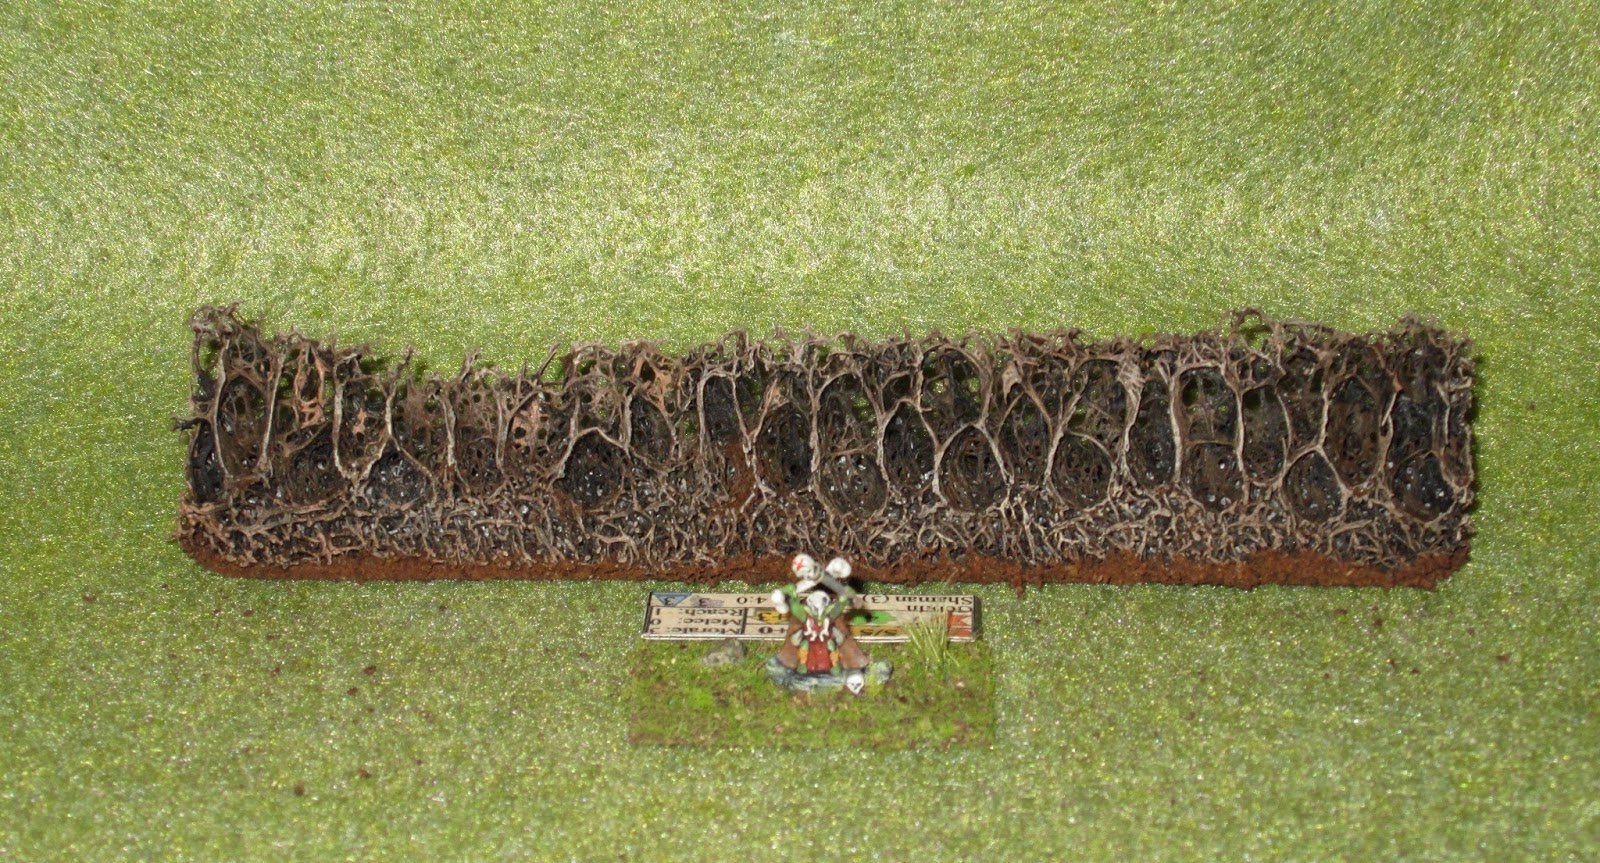
As you can see below, the loofah gives a really great thorny texture. I think, combined with some clump foliage, it could also make a good basis for bocage. The "base" of the hedge could easily be clad in air drying clay or filler to make the raised banks, and either hot glueing or super gluing clump foliage to the top would leave a thicket of branches in the middle.


Monday, 3 March 2014

Titanium Dropship Painting Competition - 2nd Place!

I recently entered the Titanium Dropship painting competition run by the guys over at the excellent Dropship Horizon (a regular lurking zone of mine). The competition had three categories, one for a squad of miniatures, one for a vehicle and one for a piece or small collection of terrain pieces.

I placed an entry in each of the three categories, a set of scratch built colony domes, a GZG Crusty heavy weapons squad made up of the mortars and arc cannons, and a GZG Crusty light walker. Each entry was allowed three pictures, and the pictures I entered are all below.


I'm really pleased to say that the colony domes came second in their category, behind a really excellent diorama of the walker suit from District 9 in the shanty town (the same walker I entered in the vehicle category, in fact). You can see the first place, second place and third place entries at the Dropship Horizon blog, and all the other entries can be seen here.

I was particularly impressed by the conversions done to make some proxies for 15mm GW Terminators and really liked the colour schemes for the NVL troops in this entry. The ACAV combat car really impressed me with the simple but effective colour scheme and a few additions that made it look really lived in, likewise the tank from Paul at Mini Metal Mayhem. He also entered a really great set of Red Shadows that I am not totally jealous of at all.

The colony domes were plaster casts from the blister packaging  of some old Androidz toys that I picked up at the bargain bin at Toys R Us. I made four castings out of the blister packs that I had salvaged, but removing the castings wrecked the blisters, so I'm unlikely to be able to use them again. I've been making quite a few plaster casts recently, and I'm considering in investing in a few of the Hirst Arts plaster moulds to add some scifi greeblies.


I really enjoyed choosing which minis to enter for each category, and it's really prompted me to up my game for next year. Seeing the other entrants was really interesting and has given me lots of inspiration for new techniques and paint schemes to try out.

One suggestion I would make would possibly to have separate categories for professional painters and amateurs. I've no idea if this is common or not - I've never entered a painting competition before so it may be that it's common for the armature and professional painters to be competing alongside each other.

Monday, 17 February 2014

15mm Evil Empire - The Dark Suns Alliance

At the far edge of the Wytch Star Zone lies a desolate are of space known as the Dark Suns Nebula. Millennia ago a giant O type star collapsed into a supernova of gigantic proportions. The star systems around it were bathed in the outpouring radiation, plasma, gas and dust, and several other stars went novae as a result. After hundreds of thousands of years the shock waves had passed and the systems began to settle again, aside from occasional flares and meteorite impacts from the remains of the shattered star systems.


When humanity first explored the Dark Suns Nebula they found a collection of systems that had been enriched by the multiple supernovae, vast deposits of rare metals and minerals could be found in drifiting asteroids and the scarred and cratered planets that remained. But conditions were hellish, radiation was high and almost none of the planets retained their own atmospheres. Giant industrial complexes were buit on the remains of shattered worlds, and clone-bred workers were forced into servitude.


The hellish conditions took their toll. Mutation and radiation damage began to be seen in the clones, and their level of inteligence was stunted, even as their strength was increased. Some of the clones were more resistant to the debilitating effects of the radiation and their mutations manifested in another way - increased mental capacity.


These clones demonstrated the ability to control the more brutish clones, and in a short while an uprising began. One by one the colonies fell to the mutants, who took over industrial plants, colonies and space stations. Very quickly a hierarchy formed, with the most mentally gifted of the clones at the top, dominating those below them. Some pure-strain humans remain, those depraved enough to side with the clones against their former masters, or those weak willed enough to be dominated by the mental prowess of the leaders. Some pure strain humans who had essential skills or special talents were also kept, and their offspring were born into a life knowing no masters but the mutant leaders.


Now, the Dark Suns Alliance, as they have come to be known, has reached a turning point. Their clones continue to be affected by the radiations of their suns, mutating in unpredictable ways. The clone leaders need to restore their corrupted genetic pool and they have decided that expansion into the nearby Border Worlds Alliance is the way to do it. Slave raids on colony worlds have begun, with captured colonist being sent to processing plants to be sampled for genetic compatibility with the clone banks. Those that are found to be compatible are rendered down to their base organic material to feed the clone tanks, those that are found wanting but are able bodied are sent to the mines and industrial centres whilst those that are not fit enough are sent to "work" in the protein vats and flesh farms.


In the Border Worlds, colonists now watch the skies and fear the night, as they keep a look out for the blood red ships and the faceless soldiers that spell the doom of another colony world...

Symbol of the Dark Suns Alliance
The Dark Suns Alliance are my attempt to create an "evil" antagonist force as an OPFOR for sci-fi gaming. The imagery is based loosely on the old Red Shadows from the 1980's range of Action Force action figures by Palitoy. These figures were the European version of GI-Joe, and featured some of the same vehicles with different branding. Eventually Palitoy was bought by Hasbro and Action Force was morphed into GI-Joe, including extensive stories in the Action Force comic to explain the changes in the brand.


The original Red Shadows were a WW2 German soldier body and helmet, but with a sinister face mask and coloured red. The action figure carried a bazooka reminiscent of an SA-7 Grail, but smaller. Later figures would update the body and provide different weapons, but the one or two I had were limited to the bazookas. At that time I was 10 or 11 years old, and right in the target market, but mostly I was a Star Wars fan, so the few Action Force figures and Vehicles I got wound up being folded into my imaginary Star Wars Mythology.


  My second inspiration for the Dark Suns was the first set of RUSK troopers released by Armies Armies. I got in on the pre-order for these ages ago, but they have mostly been languishing with base coat on, with just a few figures painted.


I also got an undead Nazi figure from Rebel Miniatures, I think, and he seemed to be  the ideal commander for them, adding a touch of the Red Skull to the mix.


The two large droids either side are Rebel Miniatures TOMCats, the one on the left above having been modified to include a large heavy weapon on his left arm and an extra powerpack and connecting cable on his back.


In addition to the ground forces, I also have some vehicles already painted up for the Dark Suns, the Poundland hovercraft I had previously blogged about, and the kit-bashed skimmer from the Land Booster Spirit kit.


I also have one of the old style Dream Pod9 Moab Combat Mounts, which is all metal and ever so slightly different from the one in the link. I have yet to photograph mine, but here is one painted by another, mine is in the same red and black as all the other DSA troops.


Wednesday, 8 January 2014

New Project - 4th Corporate War. Part 1 - Background

I have always been a big fan of the R. Talsorian RPG Cyberpunk 2020. I ran a very long and successful campaign over a number of years, taking my players from the US, through Europe on the Eurotour, a long chase after one of the players contacts across the UK as it transitioned from Martial Law to hidden Corporate Law, and then back to the US for the cross continent chase that was Land of the Free.


Our group broke up just as RTG released the first of the 4th Corporate War books, Firestorm: Stormfront, which was a shame, as it had some really excellent stuff in it. Stormfront details a conflict between two of the lesser corporations of the Cyberpunk world, OTEC and CINO, as they fight over the remains of a third corporation, IHAG.


This portion of the nascent corporate war is known as the Oceanwar, as it takes place below the sea. It apparently used a lot of the previously unreleased material from a cancelled supplement called O-Zone. In this phase of the war both corporations are trying to gain control of as much of IHAG's real estate as they can, protect their own stoof and also weaken the opposition. Both corporations start to use special operations troops, hired as freelancers from the two biggest, baddest corporations on the block: Militech and Arasaka.


Militech is a US based weapons manufacturing and security corporation. Think Lockheed-Martin, General Dynamics, Blackwater, Executive Action and basically the whole industrial part of the military-industrial combine privatised and run by one bombastic, bullish, ego-maniacal hyper-patriot who wants to see the US dominate the whole world (the CP2020 world is iconic, but never claims to be realistic).


Arasaka is a Pacific Rim based security and weapons manufacturing corporation. Think Blackwater, Executive Action, Lockheed-Martin, General Dynamics and basically the whole industrial part of the military-industrial combine privatised and run by one vicious, neo-Samurai with a twisted code of Bushido honour that hates the US for the damage done to his homeland (the CP2020 world never claims to be realistic, but is iconic).

See what I did there?


The next phase of the war was the Shadow War. As the special ops teams started to strike directly at OTEC and CINO offices on land, they inevitably started crossing paths with Militech or Arasaka regulars, instead of going up against other SPECOPS teams. At some point the strikes started being less about OTEC and CINO, and more about Militech vs Arasaka. The shadow war is fought by spies and prowling assassins, blacked out vans snatching people off streets and tricked out, smart wired, electro-thermal-chemical enhanced sniper rifles firing fin guided ramjet micro sabot shells with armour-piercing explosive payloads over thousands of meters.

Eventually the Shadow War became more overt, and Militech and Arasaka start to target each other directly and in the open. They begin to field troops on city streets in defiance of the local and national governments. In Japan, Militech is quickly exterminated, as Arasaka pretty much IS the police, in Europe (which is a golden paradise compared to the rest of the world (except Britain, because we're contrary)) both sides are warned once, then stomped on by the European elite. The rest of the world, however, is turned into a battleground.


Whilst I can see the fun in some underwater fighter-sub-vs-fighter-sub battles (using modified Silent Death, maybe?) and sneaky-sneaky assassinations missions, the real war gaming potential is in the open warfare in the  second book of the series, Shockwave. Much of the action in Cyberpunk is set in the fictional Californian metropolis known as Night City, situated between LA and San Francisco.


Night City was covered in a ridiculously detailed handbook that had an entry for every building on the map above, and multiple entries for some buildings. This is the map I'm planning to use for a 4th Corporate war game.

Next time I'll talk about gaming and campaign rules, figures and terrain.