Showing posts with label Kitbash. Show all posts

Thursday, 22 January 2015

Combat Wombat Assault Lander and Kitbashes

Another round of VTOL 15mm goodness.

First up is the Combat Wombat Assault Lander. Scotty at Combat Wombat very kindly sent this to me along with the missing pod from the first of my Bullfrogs - he's a clearly a gent of impeccable taste and refinement so I encourage you all to order oodles of his fine wares.

The combat Lander comes in 7 resin parts and 1 turned brass barrel for the nose mounted gun. The resin parts are three landing legs, the main body, two engine pods and the chin turret. There was some flash and a few bubbles on the model, but nothing that a few strokes with a file couldn't clean up, although I was rather brutal with the delicate edge of the engine intakes on one side and erased some of the raised detail. My own fault entirely.


All the parts fitted well together with minimal sanding to get the engine pods square. The gun required a small hole expanding in the chin turret to take the turned brass barrel. 


I have added a pair of missile pods to the sides to give the Assault Lander some extra teeth. The ship very much reminds me of the Raptors from the new Battlestar Galactica, and I recall there were several episodes where the normally unarmed Raptors were loaded up with missiles. The pods are actually made from a pair missile turrets designed for 6mm miniatures from Old Crow.


You can just see a chip in the resin of the lower corner of the canopy from my clumsy handling (or more accurately clumsy dropping).


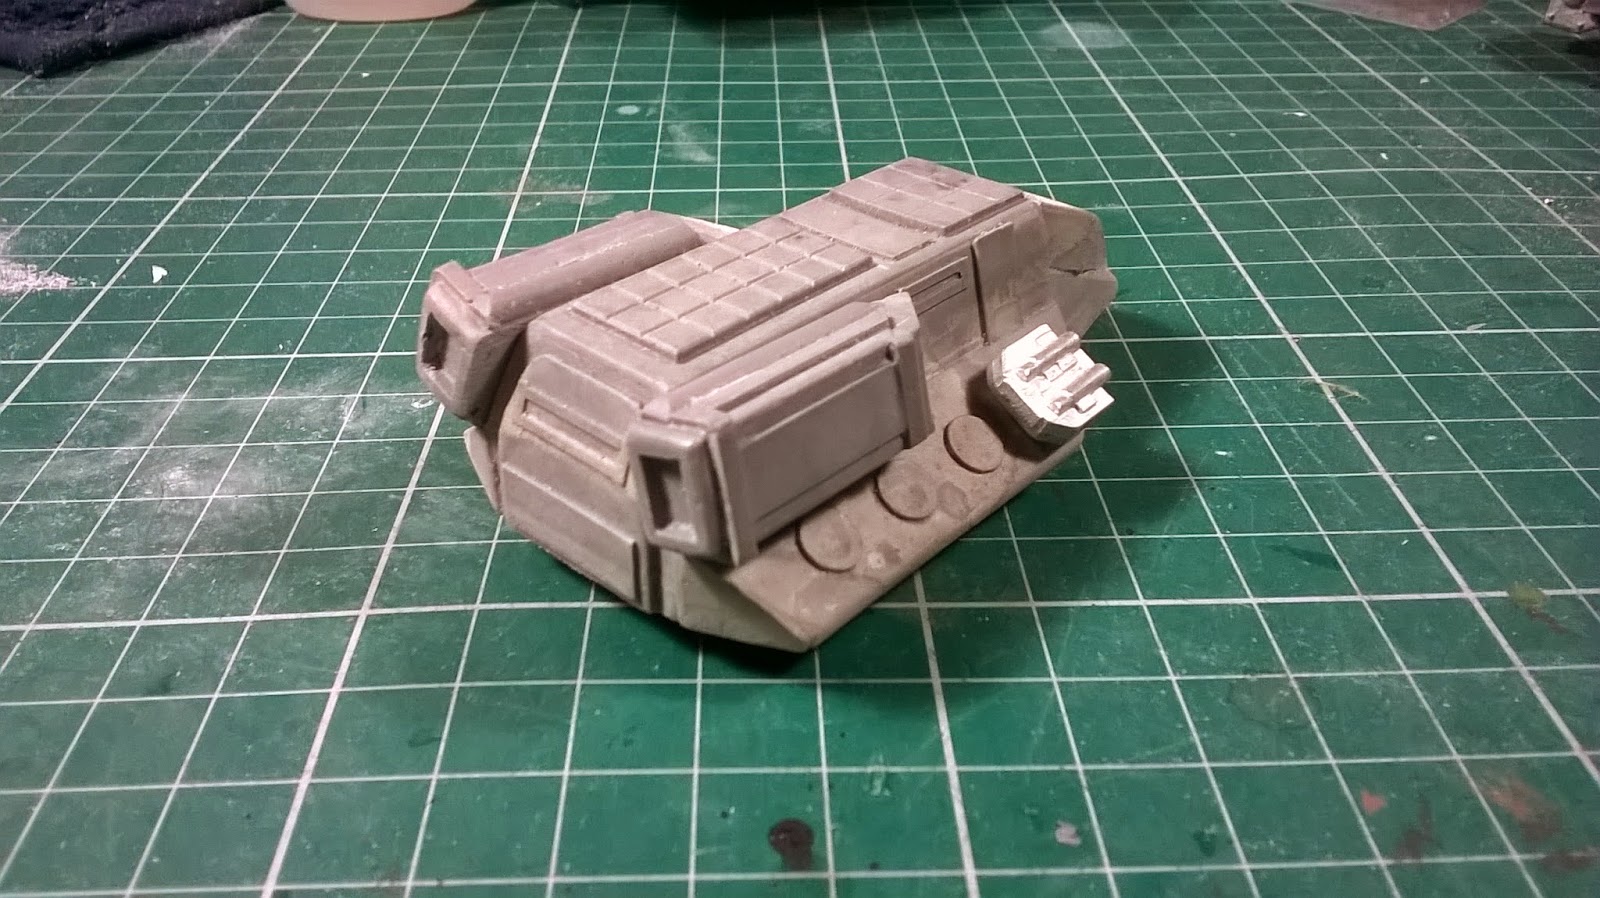
Overall the assault lander makes for a really nice little model. It's generic enough that it could fit into a near-future game as an aerodyne or VTOL lander of some kind, a space opera or star-trek style game as a shuttlecraft or even some sort of combat lighter for a GrimDark game if you choose.

Next u is a kitbash of a Revell KA-50 Hokum snapfix kit.


I originally picked this up when Hobbycraft was closing down to use in Battlefield Evolution: Modern Combat as a proxy for a Chinese helicopter gunship. First game out I was chiding my nephew about being careful with his M1A2 Abrams tank models so as not to damage the delicate aerials on them when I turned around and knocked the unfortunate helicopter to the floor, snapping it's fiendishly complex contra-rotating rotor blades off and dislodging the cannon, never to be seen again. Much hilarity ensued.


Since then the chopper has languished in the bitz box. I eventually got around to doing something with it. Antigrav pods are the breech units of some spare weapons from the CMG Blackguard Mecha. The barrels have been chopped off and sanded down to leave the ribbed pods. I have some detailing parts on the way from Japan that I will use to add errr... detail to the pods before painting. Other bits include a spare cannon from my CMG ZAS tanks , rocket pods from Rebel Miniatures and spare missile clusters from Clear Horizon Miniatures excellent Raven VTOL.


I have to add the details as mentioned above, plus do some gap filling before she'll be ready for painting. I think the final decision on if the kitbash has worked will only come after she's been undercoated. At the moment the yellow/brown/green camo pattern looks juts too toy like. Watch this space.

Next we have a platoon of hovertanks kitbashed from a Battlefront PT-76 platoon that I got half price at SELWG this year (bargain!)


I have put the tracks in the bits box and replaced them with VTOL lift engines from Micropanzer. When I contacted Jason he originally had the lift engines as resin pieces and I wanted to check he'd be OK to cast up 50 of them (8 per tank plus some spares, 'cos who knows when you'll need a VTOL engine). Jason advised he was now able to produce them in metal and 50 would be no problem. As it happened I used 9 on each of the tanks anyway, so the spares came in handy.


Shots on my painting table. Sorry about the mess (flips a coin to the bartender...)


Each of the tanks got 4 lift engines on either side plus an upturned one on the rear as a drive engine. The engines had a gentle sweep down to a point behind the duct which I had to cut away. You can actually see the same piece in use on the Bullfrog Lander  from Combat Wombat as a lift engine in my previous post. I believe this is a result of Scott and Jason working together on some designs in the past.


I was originally going to replace the Battlefront supplied 76mm cannon with a 4mm steel ball bearing and a small disk of styrene to make a short barreled laser emitter, but instead I used another of Scott at Combat Wombats turned metal barrels. With just a short pilot hole drilled these fitted perfectly. I also added a pair of missile launch tubes from a die-cast toy and relocated the Dshk heavy machine-gun.


The turrets were affixed using the supplied 2mm rare earth magnets. I even managed to get all the polarities round the right way so any of the turrets could be used on any of the tank chassis.


I've also added flight-stand toppers from Litko (available from Figures in Comfort in the UK) which I find to be an excellent way of supporting most flying things. I use them on my Full Thrust ships, Tumbling Dice 1/600 aircraft for Air War: C21 and as flying stands for various 15mm. I've also chopped some stands down to give a grav-floater effect, as you can see in the group shot below.


Monday, 3 March 2014

Titanium Dropship Painting Competition - 2nd Place!

I recently entered the Titanium Dropship painting competition run by the guys over at the excellent Dropship Horizon (a regular lurking zone of mine). The competition had three categories, one for a squad of miniatures, one for a vehicle and one for a piece or small collection of terrain pieces.

I placed an entry in each of the three categories, a set of scratch built colony domes, a GZG Crusty heavy weapons squad made up of the mortars and arc cannons, and a GZG Crusty light walker. Each entry was allowed three pictures, and the pictures I entered are all below.


I'm really pleased to say that the colony domes came second in their category, behind a really excellent diorama of the walker suit from District 9 in the shanty town (the same walker I entered in the vehicle category, in fact). You can see the first place, second place and third place entries at the Dropship Horizon blog, and all the other entries can be seen here.

I was particularly impressed by the conversions done to make some proxies for 15mm GW Terminators and really liked the colour schemes for the NVL troops in this entry. The ACAV combat car really impressed me with the simple but effective colour scheme and a few additions that made it look really lived in, likewise the tank from Paul at Mini Metal Mayhem. He also entered a really great set of Red Shadows that I am not totally jealous of at all.

The colony domes were plaster casts from the blister packaging  of some old Androidz toys that I picked up at the bargain bin at Toys R Us. I made four castings out of the blister packs that I had salvaged, but removing the castings wrecked the blisters, so I'm unlikely to be able to use them again. I've been making quite a few plaster casts recently, and I'm considering in investing in a few of the Hirst Arts plaster moulds to add some scifi greeblies.


I really enjoyed choosing which minis to enter for each category, and it's really prompted me to up my game for next year. Seeing the other entrants was really interesting and has given me lots of inspiration for new techniques and paint schemes to try out.

One suggestion I would make would possibly to have separate categories for professional painters and amateurs. I've no idea if this is common or not - I've never entered a painting competition before so it may be that it's common for the armature and professional painters to be competing alongside each other.

Saturday, 18 May 2013

Montana Space Port Part 1

A recent post on TMP about adapting the Hannah Montana Mall Madness game to various zombie rule sets inspired me to pick one up off ebay. I've been travelling for work quite a bit recently and whilst passing through various airports have been thinking about them as a venue for skirmish games. Upon seeing the game, shown below, I thought was that the central area and the raised perimeter reminded me of the jet ways for an airport, and the lower deck the apron. It also slightly reminded me of Docking Bay 94 from Star Wars.

£1.99 plus £4.00 P&P got me the ultimate evolution of the consumer culture - a board game aimed at young girls training them to enjoy shopping. I'm mildly disgusted by the premise, and I've never seen AGG so keen for me to start a conversion project as she shared my loathing for the sentiment behind the game.


I stripped the components down, and removed all the electronics from the central module. I lightly sanded the glossy cardboard game board with coarse sandpaper to key the surface and then painted the cardboard with a mix of 50/50 water and PVA to strengthen it and help stop it warping once I painted it. It didn't help. The cardboard almost immediately began to warp. I let the first coat dry and then pressed it between two MBF boards with piles of books on to straighten it out. This helped, but eventually I had to glue it down to MDF just to stop it curling up. Once glued I painted it with several coats of cream coloured exterior, textured masonry paint and left to dry.

Meanwhile, the nasty purple shop sections got two coats of Halfords Rust Red primer. This has excellent coverage and leaves a nice finish. I may try the white and black as an alternative to my usual GW sprays.

The central module was then lightly converted with the addition of a cargo arm made from bits of clicky Mechwwarrior construction mechs and some "granny grating" for a safety fence. I also added a blanking plate over the speaker with an upturned bottle lid in the centre as a planter. I'll add various greenry to it later.

The cardboard upper and the modified central part then got several coats of Plasticoat grey primer. I've had variable results with Plasticoat paints in the past, and this grey primer did nothing to swing me for or against. It covered well and the cardboard upper didn't warp at all, but it took AGES to dry, even though I mixed well and sprayed in good conditions. The finish now is excellent, though. Smooth and scratch resistant.

Whilst that was drying I cut some 1mm plasticard to size to replace the card entrances at each of the corners. I'm going to add some bunker doors I picked up from Antenoceti's workshop to these to make entrances. At the same time I cut a few blanking plates to go over the protruding middle sections of the purple shops, but I cut them too large, so they need trimming. I may leave them off all together.

Here's how it looks at the moment:
Overview. Missile turrets are Old Crow, Rebel Miniatures Sabre Dropship at the top and figures are GZG OUDF. Hexen transport at the bottom, kitbash by me.


Central unit with scratchbuilt arm and empty planter.
These are the insides of asthma inhalers that I'm considering using as fuel tanks.
The upper level still has a few burrs on it that I should have trimmed off before I painted it.
Bunker doors not yet fixed to the plasticard inserts.

I'm considering two options for the lower deck. Firstly it'll get a coat of black paint with some grey and brown highlights to make it look a bit more like it's a well used, concrete surface. I'm then considering adding some aluminium car mesh to make an actual landing pad, either directly onto the cardboard or as a "wrap around" on some foamcore, plasticard or MDF. I'll have to experiment and see what I can come up with. 

The other addition will be a few blast shields, something like this:


A simple rectangle of cardboard with a couple of supports behind it, maybe with some detailing on the face, painted with nice warning stripes, that can be used as scatter terrain in the two landing pits.

Overall, I'm really please with progress, and am looking forward to finishing it off. I just have to work out how to store it now...

Wednesday, 8 May 2013

Kitbash Part 7 - VTOL Shuttle.

A while ago I picked up a real bargain at Modelzone. It was a Bigtrak Jr. on the reduced shelf because it was faulty and was missing a part. As it turned out, the missing part was a rubber ring around one of the wheels that gives it traction when it's moving. The fault was that it went round in circles - obviously because only one of the wheels had any traction. It usually retails between £29.99 and £34.99 depending on where you see it. This was marked down to 99p! I snatched it up, if only so I could cannibalise it for bits!

Bigtrak Jr
Originally I was going to stick some weapons on it and use it as a big battle wagon for maybe my Felids or Protolene, but then AGG gave me some of her old Ventolin inhalers for my bits box. I had one on my desk and was idly playing with it whilst I was on the phone one day when I noticed that the ends looked a lot like steerable nozzles:
Inhaler
Jump jet nozzle?
After this revelation I decided to convert the Bigtrak to a VTOL lander of some kind. It then lay dormant for a while as I waited for AGG to use up sufficient Ventolin inhalers for the project to proceed.

We've just had a long weekend here in the UK, and I took advantage of it when AGG delivered a bumper crop of inhalers. The Bigtrak got bathed in Dettol overnight to remove the stickers and glue, and then lightly sanded all over. I blanked off the rear deck with some 1.5mm plasticard, and did the same to the two side sections, after carefully sawing off the fixed axles at the rear.

I then cut down and cleaned up the inhaler nozzles and marked out their positions to make sure they would all line up. After they were added I was going to add some GZG building accessory large doors to the side, but instead remembered I had some large cargo doors by The Scene (although having just looked on their website, I can't find the doors, so maybe it was someone else). I split these down the middle and added one to each side as a loading ramp. I then tried to add some detail to the hemispheric dome at the top by adding  cockpit windows from thin strip styrene. This went badly, and every window I cut seemed to be a different shape and end up in a different place. I picked these all off and sanded the dome smooth again from where the superglue had mashed it up. Instead I bent some metal windows I had to match the curve of the hull (it curves in both directions, so this was quite a trial):


I then added additional bits and pieces from the bits box, including windows and Hatches from The Scene, vents, hatches, radar domes and circuit boxes from GZG and various other odds and ends.


The landing gear was scratch built from some left over IMEX Platformer connectors  with styrene tube and rod added for the legs and hydraulics. Detail was then added with small strips of styrene. The red transparent and purple thing on the upper hull needs to have some filler added around the edges to blend it in a bit more - it's going to be another sensor dome of some kind.


The engine bells are the caps from the inhalers with wheel rims from the re-purposed Androidz pull-and-go motors. I also just noticed my camera was on the wonk when I took the above photo - the ship actually sits level.


Seconds after I glued the top and bottom hull sections together, I noticed the hole left behind by the on/off switch. I was looking for something to cover it over and dropped one of the Platformer pieces in the hole whilst I was offering it up to check the size. I then spent 30 minutes trying to rattle it back out of the hole. In the end I had to grab it with my side cutters through the hole and cut it into smaller pieces to get them out...


As you can see, it's a substantial beast. I deliberately didn't/t arm it, as I see it more as a civilian cargo/passenger lighter. I'm going to TRY to paint it with a weathered, battered kind of look, with plenty of bumps and scratches, as though it's had a long, hard life. A basic grey/white look, with maybe some red and yellow details on it. The kind of look I'm going for is something like the battered aesthetic in the new Battlestar Galactica, or the hunk-a-junk, lived-in look of the Millennium Falcon.

Monday, 25 March 2013

Full Thrust FSE and NAC kitbashes

A long time ago I bought some of GZG's excellent Full Thrust miniatures to use as Sathar and UPF forces in a game of Star Frontiers inspired Starmada (and, if Star Frontiers is something you are familiar with, check out Star Frontiersman, an irregular e-zine that covers all things Frontier - I also did some artwork for them).

There are official Star Frontiers miniatures out there, but the line is OOP, small and they are notorious for lead rot. Finding suitable proxies from GZG seemed much easier.

For the Sathar ships I used the old style NAC, as the rounded prow sections looked like the images of Sathar ships on the old Knight Hawks counters, sort of. The Sathar only had 5 classes of ship, frigate, destroyer, light cruiser, heavy cruiser and carrier, so I only bought 5 types of ship.


With the recent purchase of a new style FSE battle group I decided my old Sathar needed a bit of a spruce up and to be reclaimed as the NAC again. With the old moulds out of production, and the new range of NAC ships quite stylistically different I was left with one choice - kitbashing!

Four of the five ship classes got a modification, plus a new class was created from some left over bits. I had been using battle cruisers as escort carriers, but have since picked up a  fleet carrier, so I now have:

Corvette
Frigate
Heavy Frigate
Destroyer
Heavy Destroyer
Light Cruiser
Escort Cruiser
Heavy Cruiser
Battlecruiser
Battleship
Fleet Carrier

I also have some Strikeboats and Lancers that are yet to be painted.

The frigates were a simple modification. A short section of square styrene was added to each side . Styrene strip and rod were added for detail to create a heavy frigate.

Original frigate on the right

For the destroyer mod I removed the engines from one destroyer, and filed the surface flat. A second destroyer had the bridge and gun turret removed and the edge filed flat. The two sections were glued together to create a "stretched" destroyer. The gun turret was glued back on at the rear, and a section of styrene rod with a small aluminum tube was added to the side. This created my heavy destroyer or beam destroyer.

Original destroyer on the right

The light cruiser had a couple of bitz box additions in the form of a spare ammo clip from a VOTOMS model with a couple of sections of styrene rod and a 6mm gun turret. This can serve double duty as either a strike cruiser or escort cruiser.

Original light cruiser at top
 I didn't do anything to the heavy cruisers, as I only had a couple of them. One of the battle cruisers that I had been using as assault carriers had an additional superstructure added from a bitz-box turret off the 6x6 VAB , a Tau shield generator and some small sections of styrene rod to add detail. I also added another two 6mm weapon turrets as beam generators. Short sections of styrene tube were also added next to the existing engines to create a battleship.

Original battle cruiser on the right
 The corvette was created by taking the spare section of forward destroyer hull left over from the heavy destroyer mod and adding a few small pieces of styrene rod to the rear section to create engines. The same 6mm turret as used on the escort cruiser was added to the top.


With the addition of the fleet carrier, strike boats and lancers, I should have a sizeable and flexible force of ships.They are all going to get a fresh coat of paint, and I'm in two minds of what colours I should go for. Part of me is thinking a nice sea grey, but I have some NSL ships that are base coated in dark grey, and I'd like to keep the fleets with distinct colours. My UNSC are in light blue, the FSE in Blue/white (see below), pirate/raiders in red and a few New Israeli ships in tan. I might go for a NATO Green and black stripe pattern similar to modern British armour.

In addition to the NAC ships, I also recently picked up a starter fleet of FSE ships just before Christmas. With any of his Christmas orders, Jon at GZG often adds in a few extra surprise models, and this was no exception. I got a flotilla of strike boats, an escort cruiser and a pair of corvettes as my Christmas freebie. Thanks Jon!

The ships were assembled with Filla Glue medium - by far the best superglue I have used. It's not too thick and binds very strongly and can be used vary sparingly. The only criticism I have is that every bottle I have used has had the end of the cap snap off, meaning I have to jury rig some cind of stopper for the bottle and inevitably end up with a gummed up mess. I get mine from the ever usefull Antenociti's Workshop, and have purchased some spare bottles this time for the donor caps!

The ships were then under coated with GW Skull White as a basecoat. A very, very thin wash of an old pot of ghost grey was then applied to bring down the stark white. Individual panels were then picked out again in  skull white and the new (ish) GW Ceramite white (a very white white - if you know what I mean). The outer panels were then painted with Mordian Blue and the edges highlighted with a mix of Mordian blue and Lightning Bolt blue (a dreadful mix - original paints and foundation paints do not play well together). The engines got a coat of 50/50 Codex Grey and black with Dwarf Bronze details added here and there. Sensors and weapons were then picked out in Leadbelcher with a Chainmail highlight and finally stripes of chaos black with sunburst yellow dots were added here and there for windows.

All of the ships were then glued to Litko flight stand peg toppers (available in the UK from Figures in Comfort) and given two coats of GW Purity Seal followed by a coat of Testors Dullcoat.

Top row: Corvettes. Bottom row: Strike boats
Light cruisers
L to R: Heavy destroyer, destroyer, heavy frigate, frigate
Heavy Cruiser
 I have since picked up a couple of escort carriers, which are very nice models, plus suitable fighters.as well.