Monday, 17 October 2011

Tomorrow's War AAR and review part 2

I finally got a chance to play some Tomorrow's War at the weekend. Not, as I had expected, with my two nephews, but with my brother and another friend. They took control of the two forces and I umpired and looked up the rules as we went along. We played the 1st scenario in the book, which pits a USMC patrol against the loyal forces of the Democratic People's Republic of Glory. A US pilot has been shot down, and the US squad has to retrieve him, whilst the DPRG have to prevent the capitalist running dogs from retrieving their Yankee Sky Pirate and capture as many of them as possible.

The initial setup was as follows:

The red dots are the DPRG squads, the yellow the USMC and the black dot the pilot. Light woods were scattered around, along with a couple of buildings and a crop field surrounded by hedges. Troops by the bank of the stream could also claim cover if they were up against the bank (i.e. standing in the stream).

The first turn saw the USMC begin with initiative. The DPRG troops are hidden at this point. The USMC troops to the south by the crop field spend their turn trying to spot the enemy. They do so and transmit the information to the other two squads. USMC Squad 2 moves up to the edge of the wood and opens fire on the DPRG squad in the northern woods. This prompts a reaction from the DPRG in the building to the north who will try to fire on the USMC first. The US troops win the quality roll and get to fire first, dealing four casualties to the northern  DPRG. The DPRG in the building return fire, but it is ineffective. The USMC squad return fire on the DPRG in the building and score two casualties.

USMC Squad 3, on the far right, moves up to the edge of the woods and fires on the DPRG in the buildings, and scores a couple more casualties.

In the end phase the two DPRG squads on the left move up.

Here is the situation at the end of turn 1.


The first thing we did in turn 2 was make first aid checks for the DPRG casualties. The squad in the woods was in bad shape, with four casualties. Three of these turned out to be serious wounds, and one light wound. The squad in the building were better off as they had the medic with them - who hadn't been hit. They managed to get only 2 light wounds out of five casualties - clearly the medic was earning his pay. For turn 2 we needed to roll for initiative. The DPRG had more units, so were rolling more dice than the USMC, but the US's greater quality meant they still managed to draw with the DPRG. On a draw whoever held initiative last turn keeps it, so the US continued their advance.

The first squad advanced across the crop field and opened fire on the remains of the squad in the woods to the north, easily turning the last two figures into casualties.

Squad three, on the far right, opened fire on the DPRG squads in the building and caused another five casualties. The remaining two DPRG soldiers returned fire for no effect.

Squad two in the centre moved out of the woods and headed for the river bank. The DPRG squad on the left in the river tried to react to the movement, but weren't quick enough and the marines managed to get out of their line of fire before the DPRG could open up on them.

In the end phase the last DPRG squad moved up behind the building.

Situation at the end of turn 2 (actually, it's the start of turn 3, after we did the first aid rolls but before anybody had moved):

Turn 3 started with first aid rolls. The medic was a casualty in the building, so the basic first aid table was used. In the building there were two deaths and three serious wounds, which reduced the squad from 7 to 2 operational figures. The medic, the squad leader and both heavy weapons were lost (and nobody else was able to use them after failed quality checks). In the woods there was another death and a light wound, reducing this squad to 2 men.

The DPRG lost the initiative this turn, again, despite having more units and thus initiative dice. The USMC elected to put squad 3, in the woods, on overwatch. Squad 2, in the river, moved along the riverbank and opened fire on the DPRG in the building. The DPRG again lost the reaction test and the last two figures became casualties. USMC squad 1, in the crop field, opened fire on the DPRG squad in the woods and again the DPRG lost the quality check, and the last two figures became casualties.

At this point we elected to end the game, as the DPRG player was feeling pretty glum, after having two squads wiped out without even landing a single shot on the USMC.

So, what were our thoughts after the first run through? Both of the players liked the initiative and response mechanic, and could see how it related to real world experiences. Only one Fog of War card came up, which wasn't relevant, so we had no real feelings about that. The fire combat worked well, and we were quickly used to toting up the number of firepower and defence dice each side had.

However, there were three areas that we though were major shortcomings.

Firstly, whilst it probably was an accurate reflection of how a firefight between the Marines and "North Korean conscripts in space" would have run, it was no fun for the DPRG player to be continually losing each quality test to the marines. The DPRG had quality of D6 and the marines D8, but the DPRG just seemed not to be able to get a break. Even if they scored maximum on all their dice, the USMC could still do better.

Secondly, even though the DPRG had more men, the combination of the USMC tech level advantage (the Marines had better guns and armour, which meant the got an extra dice in attack and defence) and their higher quality meant that even when the DPRG did get a shot out at the marines, it was easily negated. UPDATE - I've re-read the relevant sections in the rules and noticed a couple of things we did wrong. Firstly, I missed off some of the modifiers for shooting and defence dice, so the DPRG troops who didn't move and satyed behind their cover should have got the "in cover" bonus, in addition to bonuses from actual cover. So, for instance, the troops in the building would have got +1d for being in cover and +1d for the cover from the building. I also capped the defence dice pool at 10 the same as the firepower pool, but there is no upper limit on defence die that I can see. Also, I didn't reduce the firepower pools for movement or reactions.

Thirdly - and this could be me reading the rules wrong - there seemed to be no penalty for having figures as casualties for morale rolls. The DPRG at one point had 5 out of 7 figures down in a squad, and had to take a morale test, but there seemed to be no penalty for all the casualties? Once the first aid roll is made and the extent of the wounds known then there may be effects, but morale rolls are made at the point when fire is taken, and thus before the first aid roll is made and thus before casualty effects are taken into account. It seemed to us that there should have been a penalty for casualties to the rolls. - UPDATE - Ambush Alley games confirmed that this was an editing error on The Miniatures Page. Apparently the wording should indicate that only combat effective troops can make morale tests, which would exclude those taken as casualties and those with Serious Wounds.

Despite those drawbacks we enjoyed the game and will have another go next time we are together again. This time we'll try with a couple of vehicles and maybe some more closely matched troops and see how we get on.

Wednesday, 12 October 2011

Older 15mm stuff

Some shots from the archive now. AGG took these pictures as part of a photography course she was doing about 18 months ago. These are the first ever 15mm figures I bought YEARS ago. The chaps here in green were part of a Laserburn set that came in a giant ziplock bag with figures, dice and maps, Assault on Tarim Towers, I think. The paintjob is a simple green ink wash with brown camo splodges. Details picked out in chainmail, black, flesh and a few other colours.


These chaps are more guys from the Lazerburn range, now carried by 15mm.co.uk. These are the Blackguard (DUM DUM DAH!). I took the name literally and painted them black. The skulls motifs were picked out in bleached bone with a brown wash. metaly bits are the ubiquitous chainmail. Very eeeevil looking.


The next lot are GZG Kra'Vak that I bought to be Kafers from 2300AD. The paintjob here is even simpler: white undercoat, old GW Armour wash on body and old GW flesh wash on the heads and hands, pick out the guns in Chainmail. I was going for speed, clearly. They aren't great paintjobs, and I'd undoubtedly do better now, but it got them on the table fast.


The next lot are GZG UNSC hardsuits. I painted these in two batches. The first half were sprayed with a light blue that I got from somewhere and then ran out of. I then had to mix a batch of matching light blue to hand paint the rest of them. I got a pretty good match, I think. They then got a wash of grey-blue to pick out the details and some black and chainmail accents on visors and guns. The light blue was supposed to be like the modern blue helmets and berets that troops operating under the UN banner wear. Again, not a great paintjob, but it got them on the table fast.
I used all of these guys in a number of games of Stargrunt II. I loved the rules, but everybody else hated it, especially the chits on the table to mark quality levels. Oh well, horses for courses and all that.

The last picture is of a Brigade Models dune buggy. At the time it was part of their Israeli forces, but now it's French. Its brown. And spotty. My camo patterns (and ability to paint the right bits - look at the over paint on the side of the canopy - shocking!) have improved since then.

Sunday, 25 September 2011

Tomorrow's War - Review Part 1

Tomorrow’s War- First Impressions.

I’ve been lucky enough to be given a review copy of Tomorrow’s War by Osprey Publishing and Ambush Alley Games. I’m not affiliated with either, and haven’t been involved in the playtesting or development of the game, so beyond getting a free copy of the game I hope I can be reasonably objective.


I have only skimmed the book so far (in casualty whilst I was waiting for Amazing Geek Girl to get her head X-rayed after a nasty collision during her adventure race yesterday), but I’ll give you my first impressions.

The book is hardbound and full colour throughout (like the new version of Force on Force). The interior text is crisp and readable, and the pages are well laid out with good use of art and graphics. Pictures of models from a variety of Sci-fi ranges including (that I have seen so far) GZG (of course...), Khurasan, Old Crow, Pig Iron and Combat Wombat.

The first section of the book details the default setting for the TW universe, which I dipped in and out of. It seems perfectly serviceable, but I already have a background in mind for my games, so will probably just steal bits from it. I do like the names, though - The Republic or Arden and Democratic Peoples Republic Of Glory - with its Dear Leader Mk1 and Mk2 tanks- very North Korea In Spaaaaaaace.

The rules that I read are similar to the the aforementioned Force on Force and use a couple of systems that I'm unsure about. The first one is that in each turn, events are effectively dictated by who gets initiative. The player with the initiative (IP) activates all of their units one by one, and the non-initiative player (NIP) then tries to react to them. Once the IP has finished activating units, the NIP gets to try and activate any that are left. There are a couple of wrinkles to this basic system, but essentially it means the IP gets to act, the NIP gets to react.

I quite like the thought behind this, and can see how it reflects modern/near future combat where if you act decisively and aggressively towards achieving your goals and you can keep up the initiative of your actions you will be more likely to succeed.

I, however, have been accused of being a very Queen Theory, reactive war gamer (Queen theory - you concentrate on taking out the most units or the biggest, baddest unit on the table; King Theory - you concentrate on meeting the objectives) who is good in defensive scenarios, but too timid in attacking, so I'm not sure how I'll take to it.

The other area of uncertainty for me is that the figures on the table don't actually represent where the figures are, but an "area of control" for that unit. You don't fire at individual figures, but at the unit, and the majority of the unit has to be X for X to take effect - cover, AOE attacks and so on. To me, this is open to abuse. I like simple, unambiguous situations where it's clear what is and isn't the case. I've had too many arguments about rule interpretations over the years and can see that this would cause many more (another thing I've been accused of more than once is being argumentative - I, of course, disagree with this most strongly...).

Throughout the book there are many examples to show how the rules work in effect, which is most welcome. The rules are also divided up sensibly, with scenarios using the rules at the end of each section, so you can apply what you have read about in a practical way. This is a very nice touch as it means you can get playing without having to digest the whole, weighty tome.

There are rules for differing tech levels and how to build interesting alien races, so you could have plucky human resistance fighters facing off against weird high-tech aliens, or tech savvy marines fighting against toothy, acid blooded aliens, or stealthy, invisible hunters. All of these could be created very easily using those rules.

My next step is to have a game with my two nephews, who I'll call Goblin (11) and Orc (14). They enjoy gaming and enthusiastically critique each rule set we try them out on. They are both fans of the TV series Falling Skies, so I might try a scenario with some plucky human resistance fighters facing off against weird high-tech aliens.

In summary, I'm very impressed by my first look. I don't think I've seen a set of war games rules with such high production values for a long time. The rules are clear and well explained and appear to comprehensively cover everything that i was looking for. Ambush Alley and Osprey have clearly got a good partnership going if this is anything to judge by and if they can keep the quality of content and product up, they will be on to a winner.

Tiny trees

A quick guide to some forest terrain I made for 6mm gaming. I have micro scale models for WW2 USA and Finns, Cold war Russians and 3 or 4 different few Sci-fi armies too. Most of the forest terrain I had was designed for 15mm or larger, so tended to dwarf all the units.

I was browsing in Hobbycraft one day and came across some wavy pipecleaner packs they had in various colours. Thinking I could do something with them, I picked up a pack.

I had already commissioned some large hex shaped pieces of MDF from Warbases.co.uk. These were originally just going to be painted green to use as a way of distinguishing area cover, by placing normal, based trees on top of – allowing me to retire the threadbare and fraying pieces of cloth I’d previously used. The hexes can be joined together to create larger areas and other types of scatter placed on them to show scrub, fields, swamp or whatever.

I started by clipping the pipe cleaners into smaller pieces, cutting through the centre of the fattest part, and then through the thinnest part. I varied the distance I made the cuts, and found after a while that it was better to leave a short section between the thinnest parts to avoid the tree looking too spindly.

Once cut the tiny trees were pushed into some handy corrugated cardboard and given a spray of GW Black undercoat to hide the very artificial green. I then used whatever green sprays I had to hand and did some very haphazard sprays over them, trying to go from dark to light in fairly even, light coats. I didn’t want the paint to clump the Chenille fibres too much. Once they were all dry I gave them a couple of coats of GW Hardcoat and a blast of Humbrol Matt varnish.

Meanwhile I started to prepare the hex bases to take the trees. I took a stack of 5 or 6 bases and used a Dremel with a 2mm bit to drill about 20 random holes in the bases. I did this by stacking them up and just drilling down through them. I did this on a cutting mat to preserve the table.

Unfortunately it hadn’t occurred to me that a Dremel will drill straight through 6 2mm MDF pieces, a 4mm cutting mat, 4 coats of hand polished varnish, 6 layers of hand buffed beeswax polish and 4 or 5mm of pine without breaking a sweat. I managed to drill 20 or so random holes in my dining room table.... Oh well. I’ll do a post on how to fill 10 or so tiny holes in a dining room table some other time.

I then sprayed some of the Hexes with a can of plasticoat brown I had to hand. I then coated them in a mix of 50/50 PVA and water and liberally coated them with Woodland Scenic’s Medium brown ballast. Once this was dry I sprayed them with Woodland Scenic’s scenery cement from a spray gun thingy. I let this almost dry before I randomly sprinkled some fine green flock and mixed scatter I had - source lost to the mists of time. Once this was done I re-sprayed them with the scenic cement and left them to dry in a nice, sunny spot. They then got 2 coats of Hardcoat and some more of the Humbrol matt Varnish.

At this point I realised I’d managed to block up all of the holes I’d drilled earlier with ballast and flock. I spent ½ hour or so with a scalpel picking out the holes again and then used a Sharpie to mark where the holes were.

Once the holes were cleared, I took the trees from the cardboard and slotted them into the holes....


I’m very pleased with the results. I plan to make another set in a winter theme to go with my Finns. I have a tub of the woodland scenic’s snow for the ground, but will probably just spray the trees with some white paint from above. I’m also going to make a few smaller trees on individual bases to act filler between the hexes.

Here are some shots of them in action with my 6mm Cold War Russians:


Friday, 16 September 2011

Big Dog

So here we have the second go at the CMG Protolene Ayame mecha. My original paint scheme was a lot of subtle airbrushing that aimed to make the suit look like a wolf's pelt or some kind of wild animal. Frankly, it sucked. It just looked like random splodges of greys and browns all over the place.

However, after using the nifty metallic paint that you have to polish up in the Secret Wedding Project I thought that it might make a nice metallic texture for the mecha.


The base coat is the Humbrol Brushed Aluminium that was polished (carefully - the resin is quite delicate) with a toothbrush. I then washed it with GW badab black to age it a bit. Over the top are a couple of Tamiya greys - Field Grey and Sea Grey I think. I then touched up the claws and "toes"with some GW Bolt Gun. Based using brown ballast, flock, Silfor tufts and a cork boulder, as usual.

I'm pretty pleased with the result.

I actually bought one of the Hunter and one of the Predator variants and swapped the arms, so each has a gun arm and a claw arm. I also have a newer Ayame Khan Scout variant with a pair of Gatling cannons which looks very mean.

I am slightly on the horns of a dilemma, though, as the rest of my Protolene forces are painted in very bold colours, partly because I figure the canine Protolene might be colour blind and also because I intend them to be a band of space pirates, so they are showing their "fierce face" by choosing to ignore camo. The Ayame, on the other hand, is quite subdued. It's not varnished yet, so I could go back and add some bolder colours, or maybe some kind of snarly shark mouth to it....

Nevertheless, I really like the Ayame's, they remind me of the Games Workshop Tau battle suits, especially the more recent versions. Combined with the GZG mini drones and the maybe the CMG Praesentia vehicles or perhaps the Khurasan Pelagic Dominate they could make good proxies for a 15mm Tau army.

Friday, 9 September 2011

GZG Japanese Powered Armour

Another relatively fast paint job for the GZG Japanese powered armour. Black base coat, grey drybrusing and a black wash. A few details picked out in GW chainmail and boltgun. I remember spending ages trying to find a away to make the squad support weapon on the second chap in from the right look more intimidating, without much success.


The leader also got an attempt at some sort of lightning or electricity running up and down his blades - not sure it's entierly sucessful, but it was worth a go.

I quite like these miniatures, the little sensor pods on either side of the helmet remind me of teddy bear ears, and after i realised that i found it a bit difficult to think of them as fearsome death dealers and not just go "ahhhhhh - how cute". Quite kwaii, as the otaku say.

Thursday, 1 September 2011

Space cat biker gang.

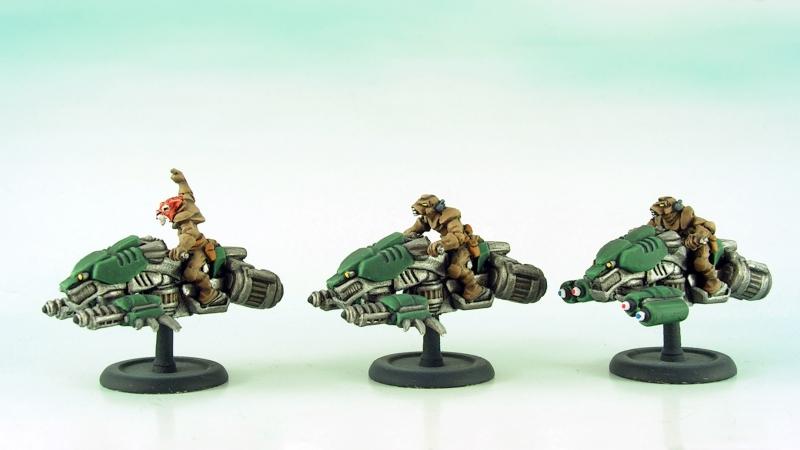
Khurasan Miniatures have just released some images on TMP of their forthcomming Felid Jetbikes.


These are made of 100% pure awesome in my opinion. I've never really felt the Felid range, but these have really piqued my interest. I may have to get half a dozen of them and some dismounted infantry just to create a Angry Space-Cat Biker Gang.

I think they'd make ideal opponents for my CMG Protolene Khanate troops AKA the Crazy Space Dog Pirates.