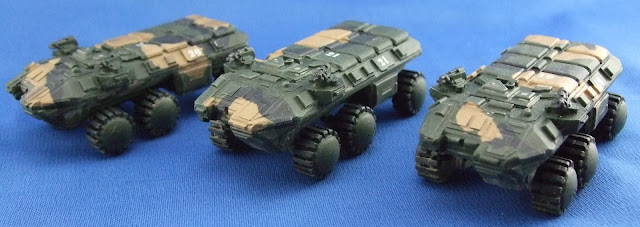
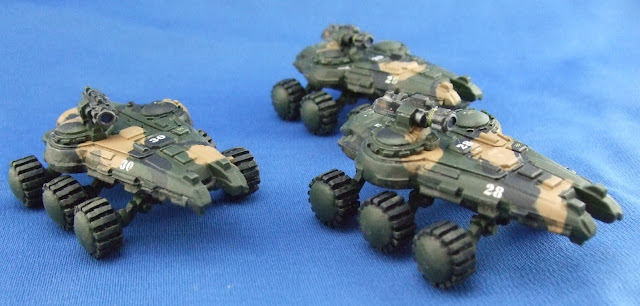
I primed the models with Tamiya fine undercoat a few days ago, then over sprayed with Tamiya Desert Sand, for the buff colour. I then decided to try using some masking fluid to make the camouflage stripes. If you aren't familiar with it, masking fluid is a thin rubber that you paint onto a model to shield it - just like masking tape, but paintable. The stuff I used was Maskol by Humbrol. An attractive pink colour with the very un-attractive fishy/ammonia smell of latex. I've never used this before, so I was keen to see how it went.
I painted it on quite liberally in swirly camo-style patterns and waited for it to dry - it turns from pink to purple once dry. I then over-sprayed black on some parts of the model, only the parts where I wanted the black stripes to be. Once dried I also masked this off, again with some nice organic, random swirlyness.
The final coat was NATO green - this and Army Painter Army Green are my two go-to colours for most military stuff these days. I let the final coat dry and once it was I set about peeling off the Maskol. The actual peeling off of the masks is very satisfying, and reminded me of my school days and amateur attempts at horror make-up for Halloween using Copydex and poster paints.
The paint job was awful, however. The transition between paint layers and the edge of the Maksol was so fine that the paint was cracking off in plates as I pulled up the Maskol. Big flakes and tiny chips were coming off, and the edges of the layers remained brittle and continued to flake as I handled the model. Consigning that technique to the junkpile (where it chatted with Salt and Hairspray), I dumped the whole lot in a pot of nail varnish remover to start over again.
48 hours later and I tried again. After scrubbing the models, picking off the now gummy superglue (it reacts to the nail varnish remover and goes all gooey) I then washed and re-assembling everything. Everything got a base coat of GW chaos black, which I was a little nervous about as the spraying conditions weren't ideal - very cold. I let it dry in the warm (and earned AGG's wrath - she's asthmatic and stinky rattlecans set her off) then added worms of Blu-tack in camouflage patterns. I've used Blu-tac before and had good results, but it can leave oily residue behind if the temperature is a bit off. I then airbrushed a first coat of Tamiya Desert Sand, allowed it to dry and then added more blu-tac worms and then my top coat of NATO green.
After letting everything dry in the warm for a couple of hours I started to unpick the Blu-Tac worms. Like removing the Maskol, this is a very satisfying process, and the results were most satisfactory. I painted the detail parts, added some NATO green to the wheel hubs - I had left the detached after the black base coat and not gone any further with them - and glued them on.
I then added decals to the models, including a number from a 1/100 Gundam detailing set by Bandai. These are really useful and have all sorts of "no step" "Access Panel" "Warning" and so on. I also added some hazard and warning stripes from Fighting Piranha Graphics, along with their numbers too. I did this in my usual way, gloss varnish, decal, MicroSol and MicroSet and then gloss over the top again to seal it in. The MicroSol really helps small decals to adhere to the contours of the model, and once they have done so the MicroSet "sticks" them down.
A quick spray of GW Purity seal to dull down and unify everything and I started weathering. I used a combination of Mig and Tamiya pigments to create what I thought was a muddy, well used look. The Mig pigments were in powder form, so I mixed them with water or a little gloss varnish to give dry looking and wet looking mud respectively. I used some of the Tamiya weathering powders to add spot effects like scorch marks, rust and dust.
I'd love to show you how awesome they looked, but I learned a hard lesson next. I sealed the weathering in with more GW Purity spray and it all disappeared. Everywhere the varnish touched the pigment, it dissolved it and it disappeared. Not amused. Apparently you can get special pigment fixative that will seal it without destroying it. Something I have to look into.
Anyway, here's the eyecandy.
 |
| A phalanx of Phalanxes |
 |
| Tiny Gundam and Fighting Piranha Decals. |
 |
| You can just about make out some of the weathering under the slope of the hull. |
 |
| Remains of the weathering on the rear of a Phalanx. |
 |
| Paladins on patrol. |
 |
| Remains of the weathering. |
 |
| Good advice from a Gundam decal. |
As an extra bonus, here are my ideas of the stats for use in Gruntz (cards created using the Barracks unit builder):


5 comments:
Those Paladins look great, they're the closest resemblance to the Mako from Mass Effect I've seen yet, good job!
These are great... those are good units for Gruntz too.
Think they turned out great!
Exceptionally good work!
Re; Using liquid masks, I find a fine coat of satin varnish between the base clour and mask helps immensly. I use the Daler Rowney stuff, a more manly colour but just as stinky.
Great work BTW.
Post a Comment